Troubleshooting
Common Troubleshooting Steps
Section titled “Common Troubleshooting Steps”As you use these pro kit features you may need to take occasional troubleshooting steps.
Disconnecting all boards from your computer, turning “master” off in your project, and then turning it back on and re-connecting the boards one at a time is a great step to get back to working order if things aren’t going as expected.
You can also always try hitting the reboot button on the boards to see if a quick reset fixes your problems. This especially helps when you first plug in the control board and you don’t see any status lights, be sure to give the reboot button a press in that case to “wake it up.”
You can always get support as well:
- The best way to get help is in the Bottango Discord community. Bottango developers and users all help each other out there.
- You can reach out to contact@bottango.com as well.
”Factory Reset” a Control Board
Section titled “”Factory Reset” a Control Board”While using the control boards, you can set them into different modes: Exported Animation Mode, Wireless Connection Mode, Create Wireless Bridge Mode, etc.
If you find yourself stuck, and can’t connect to your board, you can always do a “factory reset” to bring it back to the default configuration of live control over a USB connection.
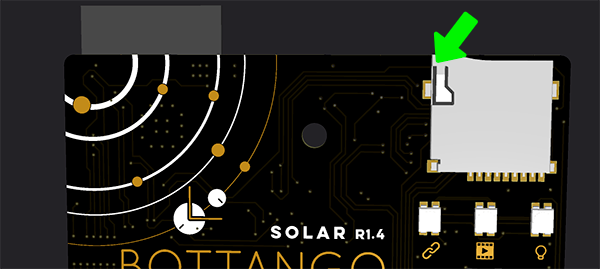
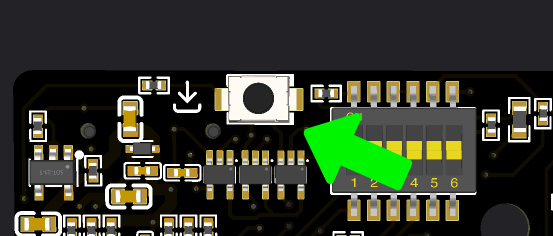
On the back of each board is a small “Factory Reset” button. It is in a different position on each board, but has the same icon. Here is the button on Bottango Solar:
First quit Bottango so that you are not connected to the board, then plug the board into your computer over USB so it is getting power.
Press the reboot button on the front of the board, then press the small factory reset button on the back of the board 5 times quickly.
When the reset occurs, the three status lights at the top of the board will flash white quickly. The board will reboot in the default configuration.
While your Bottango Solar is mounted on your Captain Cogbrow animatronic kit, you can still access the factory reset button. It is located on the back of the board, right at the top, opposite the left side of the SD card reader.